WWVB – Accurate time reception via a radio receiver

I’ve been working on a project that integrates a few ideas into one really cool project. The details of the project itself will become apparent in a few more posts as I get closer to completing the project, but I don’t want to put it all out there at once. It would make this post overly long, so please be patient as the details are revealed.

Part of this project depends on using a WWVB receiver to receive an accurate time/date signal from the broadcast station in Colorado, USA. The NIST time signal is a national radio signal that propagates along the ground throughout much of the United States. This signal is just a simple carrier wave that’s modulated to provide a digital stream of time data to anyone with a receiver. Once the signal is fully received and decoded, you have a time reference that’s just as accurate as your GPS. The nice thing about using WWVB is that the signal easily propagates through walls and you don’t need a clear view of the sky.

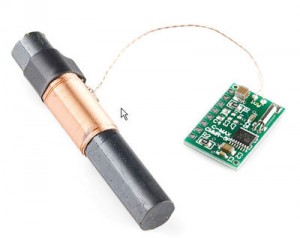
For this project, I’m using a WWVB receiver module I purchased at Sparkfun.com. This module only requires three connections: power, ground, and signal out. No complicated interfaces here, that’s for sure.  You may note in the comments on the Sparkfun site that if you live on the east coast, it’s recommended to get the longer loopstick antenna from Digikey.  I should note here that I live in western NY and I’m having no problems receiving the signal between the hours of 10pm (22:00 hours) and 12:30pm UTC.  My receiver isn’t even near a window.  The signal, in my case, has to penetrate through two walls of my house to be received and that’s not even considering the fact that there are a lot of other houses in my neighborhood that the signal has to get through.

WWVBReceiver-300x238

So, now that we have our radio receiver, we need a microcontroller and some code to be able to receive and decode the signal.  I chose an arduino pro mini for the microcontroller platform.  It’s simple to program, tiny, and more than capable of doing what I need for this project.  Of course, I also had to add a regulated 5V supply and a few other parts to make the project complete.  More on that later.

As for code, there are many examples online to look at.  I searched and found several examples, but I didn’t like the way they were written.  Very few, if any, showed good programming practices such as code reuse and small, tightly maintained functions that were clearly commented and documented.  Being frustrated with this situation, I wrote my own code from scratch.  It was easier than I expected:

note: wordpress does not make posting C code easy. If you notice any clipped or improperly formatted sections in the code below, let me know so I can fix it.:

#include 

#define wwvb 10  // input pin

#define pulseMarker 0 // all because processing doesn't understand 'enum'...
#define pulseOne 1
#define pulseZero 2
#define pulseInvalid -1

int8_t wwvbLastState;
int8_t ledPin = 13;
int8_t ledState = 0;

struct WWVBFRAME
{
  int8_t minutes;
  int8_t hours;
  int16_t doy;
  int16_t year;
  int8_t leapYear;
};

void setup()
{
  Serial.begin(9600);
  pinMode(wwvb, INPUT);
  pinMode(ledPin, OUTPUT);

  // At the start of our program, we have no idea what state our input is in
  //  or even where we are in the sequence.  Wait for two consecutive
  //  markers...
  wwvbLastState = digitalRead(wwvb);
  while (digitalRead(wwvb) == wwvbLastState) {} // wait for a transition to
                                                //  happen

}

/* note:  0.8S is a marker.  There are two to three consecutive markers at
              the start of the minute.
          0.2S is a zero
          0.5S is a one

          The signal transitions low for the start of each pulse.

          In this program, pulse types are represented as an int value
          according to the following:  0 = marker; 1 = logical one;
          2 = logical zero.  An enum would have been a more elegant solution,
          but processing doesn't have enums as far as I can tell (gives a
          compile error).
*/

void loop()
{

  // Rant:
  // Somethings *really* not right when you can declare this variable *two*
  //  different ways *and* one of those ways is kinda broken.  For instance,
  //  saying "WWVBFRAME wwvbFrame" works if you never have to pass it to a
  //  function.  To get passing to a function to work, you have to change the
  //  declaration to "struct WWVBFRAME wwvbFrame".  This is broken, imho.
  //  Either complain ALL THE TIME about the incorrect declaration or ACCEPT
  //  BOTH.  The last thing I want to do is to waste time debugging code that
  //  fails mysteriously without any explanation!
  struct WWVBFRAME wwvbFrame;
  int8_t dataValid = 0;

  resetWWVBFRAME(&wwvbFrame);

  while(1)
  {
    if (dataValid > 0)
    {
      Serial.print("valid: ");
      showTime(&wwvbFrame);
    }
    resetWWVBFRAME(&wwvbFrame);
    dataValid = 0;

    waitMinuteMarker(); // wait for next frame start...

    wwvbFrame.minutes = wwvbGetMinutes();
    if (wwvbFrame.minutes < 0) continue; // error - go back to the beginning
                                         //  of the while loop  

    wwvbFrame.hours = wwvbGetHours();
    if (wwvbFrame.hours < 0) continue;

    wwvbFrame.doy = wwvbGetDayOfYear();
    if (wwvbFrame.doy < 0)  continue;

    if (wwvbSkipDUT1() < 0) continue;

    wwvbFrame.year = wwvbGetYear();
    if (wwvbFrame.year < 0) continue;

    wwvbFrame.leapYear = wwvbGetLeapYear();
    if (wwvbFrame.leapYear < 0) continue;     // If we made it here, we have
      dataValid = 1;                                       // valid data
  }
} 

void resetWWVBFRAME(struct WWVBFRAME *w)
 {   
  w->minutes = -1;
  w->hours = -1;
  w->doy = -1;
  w->year = -1;
  w->leapYear = -1;
}

void showTime(struct WWVBFRAME *w)
{
  Serial.print("DOY: ");
  Serial.print((int) w->doy);
  Serial.print(" Year: ");
  Serial.print((int) w->year);
  Serial.print(" LeapYear: ");
  Serial.print((int) w->leapYear);
  Serial.print(" Time(UTC): ");
  Serial.print((int) w->hours);
  Serial.print(":");
  Serial.println((int) w->minutes + 1);
}

int8_t wwvbGetMinutes(void)
{
  int8_t minutes = 0; int8_t temp = 0;
  minutes = wwvbGetNumber(3, 10);
  if (minutes < 0) return minutes;

  temp = getPulseByType(); // discard unused pulse

  temp = wwvbGetNumber(4, 1);
  if (temp < 0) return temp;  

  minutes += temp;
  return minutes;
}

int8_t wwvbGetHours(void)
{
  int8_t hours = 0; int8_t temp = 0;

  temp = getPulseByType();
  if (temp != pulseMarker) return -1;

  temp = getPulseByType();  // discard unused pulses
  temp = getPulseByType();

  hours = wwvbGetNumber(2, 10);
  if (hours < 0) return -1;

  temp = getPulseByType(); // discard unused pulse

  temp = wwvbGetNumber(4, 1);
  if (temp < 0) return -1;  

  hours += temp;
  return hours;
}

int16_t wwvbGetDayOfYear(void)
{
  int16_t doy = 0; int8_t temp = 0;

  temp = getPulseByType();
  if (temp != pulseMarker) return -1;

  temp = getPulseByType();  // discard unused pulses
  temp = getPulseByType();

  doy = wwvbGetNumber(2, 100);
  if (doy < 0) return -1;

  temp = getPulseByType(); // discard unused pulse

  temp = wwvbGetNumber(4, 10);
  if (temp < 0) return -1;
  doy += temp;

  temp = getPulseByType();
  if (temp != pulseMarker) return -1;

  temp = wwvbGetNumber(4, 1);
  if (temp < 0) return -1;

  return doy + temp;
}

// DUT1 is not used in this project.
int8_t wwvbSkipDUT1(void)
{
  // note: it may be a good idea to beef up the error checking here
  int8_t i;
  for (i = 0; i < 5; i++) // two unused pulses plus the DUT1 sign bits
    getPulseByType();     // skip over them...

  int8_t temp = getPulseByType(); // verify marker
  if (temp != pulseMarker) return -1;

  for (i = 0; i < 4; i++) // skip the DUT1 value
    getPulseByType();

  return 0;
}

int16_t wwvbGetYear(void)
{
  int16_t year; int8_t temp;
  temp = getPulseByType(); // discard unused bit

  year = 2000 + wwvbGetNumber(4, 10);
  if (year < 2000) return -1;

  temp = getPulseByType();
  if (temp != pulseMarker) return -1;

  temp = wwvbGetNumber(4, 1);
  if (temp < 0) return -1;
    return year + temp;
} 

int8_t wwvbGetLeapYear(void)
{
  uint8_t leapYear= getPulseByType(); // unused pulse

  leapYear = getPulseByType();
  if ((leapYear == pulseInvalid) ||
      (leapYear == pulseMarker))
    return -1;
  else if (leapYear == pulseOne)
    return 1;

  return 0;
}

/* wwvbGetNumber() - this is one of the core functions that makes the
    whole thing work.  This function gets called to retrieve a sequence
    of pulses from the wwvb stream and convert those pulses into an
    integer.  Typically, the numbers are encoded as binary bits and their
    position in the stream determines if they are to be multiplied by 1,
    10, or 100.  In addition, there is some error checking going on to make
    sure we are receiving a valid signal from teh receiver.  The count
    variable is expected to start at 1 instead of 0 and indicates the number
    of pulses to be evaluated.  As is common in the rest of the code,
    we return -1 if we detect an error.
*/
int16_t wwvbGetNumber(int8_t count, int multiplier)
{
  int8_t i; int8_t result = 0; count--;
  for (i = count; i >= 0; i--)
  {
    int8_t pulse = getPulseByType();
    if ((pulse == pulseInvalid) ||
        (pulse == pulseMarker))
      return -1;

  // Note: Lesson learned: never send a floating point function to do an
  //    integer operation.  In converting the numbers, I originally used
  //    a conversion trick I had learned from programming on pc's where
  //    you set up a loop counting down to zero and use the counter variable
  //    with the pow() function from the math library to determine the value.
  //    In our case, a one in the data stream indicates a value of 2^i.
  //    However, in 'arduino-land', this does *not* work. Somehow when you
  //    try to compute anything equal to or above 2^2, a rounding error
  //    occurs and internally you get back something like 3.9 which, when
  //    cast back to an int, gives you 3 instead of 4!  Bit shifting is fool
  //    proof.

 if (pulse == pulseOne)
      result = result + (multiplier * (1 < 900)          // error conditions. Pulse must be between 150 
     return pulseInvalid; //   and 900mS long. 
   else if (pw  650)
     return pulseMarker;  
   else if (pw > 350)
     return pulseOne;  
   else 
     return pulseZero;  
}

The above code has been fully debugged and works great.  Sure, it could use some improvements like better error checking in a few places, but it handily gets the job done.  I’ve left in some comments that I used to help me remember how to decode the signal that I could have removed, but then thought it would probably make the program more readable if I left them in.

In our next post, we’ll be integrating this with a real time clock module so that we can have an updated and accurate source of time 24 hours a day.  Currently, atmospheric and man-made noise make it impossible to depend on a solid signal throughout the day.  However, I can say that I do get at least one valid WWVB frame per day, so that coupled with a RTC module should give me time keeping abilities that are more than close enough for my project.
Forged Emails

Note: this is a re-publishing of a post I had on my blog back in 2007.  Lately I’ve been getting quite a few questions regarding this topic, so I decided it would be good to bring this material back to the forefront.

Every once in a while, I get asked the following question: “I just got an email that says I tried to send an email message to someone I’ve never heard of and it bounced back. Why?” Or it goes something like this: “I got a message that says I tried to send a virus to someone and the email was rejected. How is that possible?” Well, the answer is a little technical, but I’m going to show you how this happened.

The short answer is that someone created a fake email that shows you as the sender. The reasons for doing this are usually related to adware, spyware, or viruses. Basically, they’re trying to install a piece of software onto as many systems as possible without the users knowing about it. The end result can range from something that’s just plain annoying to stealing the contents of your bank account and you can bet someone is getting paid to do it. By naming another valid email account as the sender, they raise the potential to get their virus/adware/spyware installed onto at least one computer. If the recieving email account exists and there isn’t any antivirus software scanning the email, it might get installed on that user’s computer, if the reciever opens the message along with any attachments that are inside it. If the message bounces back to the email account named as the sender, the person named as the sender would naturally be confused by a message he or she didn’t send. Consequently, they investigate the content of the original message and wind up unintentionally installing the nastyware on their computer instead. It’s a win-win situation for the person who’s trying to infect as many machines as possible even though it leads to confusion for the recipients.

That leads us to the question of how it’s possible to create a message and name a false To: and From: address. To start, the malicious user connects to a SMTP server somewhere on the internet and issues the necessary commands to send a message with your email address in the From: field. This is possible because most SMTP servers do not require the user to authenticate themselves before issuing the necessary commands to send an email. Therefore, any anonymous user on the internet can send an email that pretends to come from anyone else in the world! This problem was introduced with RFC821 in the early days of email. If you go ahead and read that document, it will tell you how to manually send an email, but it’s rather long and complicated. Here’s an example of how to open a connection to a mail server, create a fake message, and get the mail server to deliver it: (Note that the ‘>’ characters have been added here to mark where I manually entered commands to the SMTP server. In reality, those characters don’t actually appear on the screen. Names of servers and email addresses have been changed to protect private information and I emphasize that this is only an example – not a real message I may have tried to send):

C:\> telnet smtp.somedomain.com 25

220 smtp.somedomain.com ESMTP Server (Microsoft Exchange Internet Mail S
ervice 5.5.2657.72) ready
> HELO nastyware.com
250 OK
> MAIL FROM: John.Smith@redmail.com
250 OK - mail from <John.Smith@redmail.com>

> RCPT TO: Joe.Johnson@bluemail.com
250 OK - Recipient <Joe.Johnson@bluemail.com>
> DATA
354 Send data.  End with CRLF.CRLF
Subject: Your password has been updated.
Date: September 10, 2005
From: support@somebank.com
To: Joe.Johnson@bluemail.com

Your password was recently updated in our system.  If you did not change your 
password, please use the link below to notify us that someone has illegally 
accessed your banking information.  Thank you.

http://www.S0mebank.com/support/unauthorized_access.asp
.
250 OK
> QUIT
221 closing connection

Connection to host lost.

C:\>

As you can see from the above example, I lied about who I am and why the message was being sent. Furthermore, I named John.Smith@redmail.com as the sender, but the actual body of the email indicates that email was sent by support@somebank.com. This is so the person who eventually recieves this email will think their bank is trying to alert them to some kind of unauthorized access. If this message bounces because the recipient’s email isn’t real or because their spam filter rejects it, John.Smith@redmail.com will recieve the message instead. It won’t bounce back to the support@somebank.com address because the addresses in the body of the message aren’t used for delivering the message. Those addresses are only used by mail client software such as Outlook, Netscape, or Thunderbird for replying to the messages after they are delivered. Digging a little deeper, you’ll also notice that the url at the bottom of the message body has a zero where there should be an ‘o’ so that when the user clicks on the link, they will be directed to a website that looks like the website of their bank. The reality is that the website is most likely run by the person who forged the email and is designed to lure the recipient into revealing their account information such as an account number and password.

Unfortunately, RFC821 allowed this sort of abuse and had no protections in place to prevent it. There were no provisions in the specification that would require end-users to provide any proof of their identity before an email message would be accepted for delivery. Furthermore, most implementations of the protocol didn’t check to see that the addresses given in the MAIL FROM: and RCPT TO: portions of the protocol matched those addresses given later on in the body of the message – the From:, To:, and Reply-To: lines. Consequently, it was very easy to create a message like the one above and nearly every mail server on the internet would happily accept the message for delivery.

Fortunately, many email providers today are starting to require that users authenticate to the server before the server will accept an email message for delivery. In addition to that, some mail servers have restrictions in place to help verify the email addresses specified on the MAIL FROM: line match those used in the body of the message. Another methon being adopted is to have the mail server verify that the MAIL FROM: address belongs to a valid account.

However, even with those restrictions in place, you will still get the occasional fake message because most mail servers don’t have a reliable way of verifying the authenticity of a message when it gets passed from one mail server to the next. The typical example is where Joe sends an email to John. The message goes to bluemail.com’s email server for routing and delivery. That server then passes the message to redmail.com’s mail server for delivery to the end user. Redmail.com’s mail server doesn’t have any way to verify that Joe.Johnson@bluemail.com is a real mailbox. It can’t because only bluemail.com’s servers know what addresses are registered in the system. As a result, redmail.com’s servers accept the message for delivery.

Thankfully, this situation is slowly changing and the holes in the system are being plugged. Unfortunately, until all of the insecurities in the system are eradicated, you’ll still get fake emails and there isn’t much that can be done about it in the short term. In closing, if you avoid opening attachments and refuse to just click on the links you recieve in your email, you will be much better protected from these kinds of problems.

Disclaimer: The above is an example of a malicious message and is not intended to represent an actual email that may have been sent or recieved. The information given is a result of a real email message, but the content has been changed significantly to illustrate the themes mentioned in this posting.

Serial Debugging without a UART

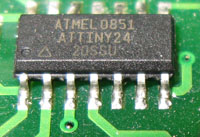
attiny24I sometimes have projects using AVR microcontrollers – specifically, I use the ATTiny24 quite a lot since it has a fair number of IO lines and has most of the basic features you would expect from an AVR.   The only problem I have with this chip is that it doesn’t seem to have a full UART on it.  I’ve looked through the datasheet at the universal serial IO it has, but it doesn’t strike me as being useful for RS-232 communications.  Besides that, if you have the code I’m going to show you in this post, you can do RS-232 output on any unused pin without the need for a UART, which in my opinion, is a more flexible solution.

(Yes, you can use JTAG if you have the tools for it, but it’s not ideal when all you really need is simple feedback to know what/how your program is behaving.  I actually have the JTAG ICE mkII and I mostly just use it as a programmer if I’m writing my program in C.)

To do this, you need to know about two basic approaches to structuring a program for an embedded system.  First, we’ll be implementing an interrupt driven scheduler that uses a timer.  The timer helps to ensure that the serial output line is changing at the correct rate so that the remote system can understand the data being sent.  In this example, we’ll be trying to communicate at 9600 baud, so we’ll need to have the timer interrupt occur every 0.104mS (1/9600 = 0.104mS).  Each time the interrupt occurs, we’ll change the state of the output pin to signal the next bit to be transmitted.

The second concept we’ll need to implement is a state machine.  Basically, we need to keep track of where we are in the current byte to be sent as well as where we are in the output string.  As each bit is sent, we need to determine if the current byte is  just beginning and we need to send a space (start) bit or if the current byte is ended and we need to send a mark (stop) bit.  (See Wikipedia for an in-depth discussion of the RS-232 protocol.)  The state machine is built around the use of a few variables and control logic so that the information sent complies with the protocol.  Here is the code:

/* Headers needed for this module */
#include <stdio.h>
#include <string.h>
#include <inttypes.h>
#include <avr/interrupt.h>
#include <avr/pgmspace.h>
volatile char msg[32]; // message buffer
//Sample message - note how the string is null terminated so we can use strcpy()
const char testmsg PROGMEM = "Testing Serial IO!\r\n";
// This line is our output for serial data
#define SEROUT PB2
// Scheduler interrupt frequency.  This directly affects the baud rate
//  for serial communications.  Do not change this.
// This was approximately calculated as follows (some tweaking was needed):
//    ((0xFFFF) - ((1 / BAUD) / (1 / F_CPU)))
#define TCNT1_CNT  0xFD00
void init_timer(void)
{
 TCCR1A &= ~(1<<COM1A1) & ~(1<<COM1A0) & ~(1<<COM1B1) & ~(1<<COM1B0) &
    ~(1<<WGM11) & ~(1<<WGM10);
 TCCR1B &= ~(1<<ICNC1) & ~(1<<WGM13) & ~(1<<WGM12) &
    ~(1<<CS12) & ~(1<<CS11);
 TCCR1B |= (1<<CS10);
 // WGM13:0 = 0 for normal mode
 TIMSK1 |= (1<<TOIE1);  // interrupt on overflow
 TCNT1 = TCNT1_CNT;
}
ISR(TIM1_OVF_vect)  // TimerCounter1 overflow interrupt handler
{
 /*  Some of the frequency calculations may need to be tweaked to make
  it so that the routines execute with an acceptable amount of error.
  Since we are bit banging serial communication, the amount of error
  we can have before the serial stream turns to garbage is fairly
  small */
 TCNT1 = TCNT1_CNT; // reset counter for next time
 // This must be done first because the timing is critical
 do_serial_comm();
// ... do other things if need be....
  }
}
void do_serial_comm(void)
{
 /* State machine to output serial data.  This function must be
  called with the proper frequency to output serial data at the correct
  rate.  If the rate varies slightly, the baud rate won't be stable
  enough to ensure the data can be understood by the remote host.
 */
 static volatile uint8_t bitPos = 8;
 static volatile uint8_t charPos = 0;
 static volatile uint8_t needStopStart = 0;
 static volatile char curChar;
 /* The order of the following blocks is critical.  For this
  state machine to work correctly, we have to do something
  with the transmit line every time this function is called.
  The operation to be performed depends on where we are in
  current character and the message itself.
 */
 // send serial data
 if (needStopStart > 1)
 {
  PORTB |= (1<<SEROUT);    // logical mark output
  needStopStart--;
 }
 else if (needStopStart > 0)
 {
  PORTB &= ~(1<<SEROUT);   // output a start bit
  needStopStart--;
 }
 else if (bitPos < 8)        // LSB first
 {
  if ((curChar & (1<<bitPos++)) == 0) // bit is 0
   PORTB &= ~(1<<SEROUT);
  else       // bit is 1
   PORTB |= (1<<SEROUT);  
 }
 else if (charPos < strlen(msg))
 {       // move to the next byte
  curChar = msg[charPos++];
  bitPos = 0;
  needStopStart = 3;    // Sends 2 idle bits + 1 start bit
  PORTB |= (1<<SEROUT);   // Idle the line
 }
 else  // only get here if bitpos is 0 and curPos = strlen(msg)
 { // end of string
  strcpy(msg,"");         // blank the message
  bitPos = 8;
  charPos = 0;
  needStopStart = 0;
  PORTB |= (1<<SEROUT);   // Idle the line
 }
}
/* Code */
int main(void)
{
 init_timer();
 strcpy(msg, testmsg); // initialize output message
 sei();    // enable interrupts
 
 for (;;) {}  // loop
}

Some of the above code may look confusing, but it works quite well.  Our cpu is configured to run at 8MHz from the internal oscillator.  Since that timing source is going to drift from chip to chip, some tweaking of the counter overflow value may be needed to get the timing of the serial line changes to work correctly.

In the do_serial_comm() call, the needStopStart value is used to output the necessary stop, idle, and start bits that have to occur in between each byte.  Since the sequence in between each character is always the same – a stop bit, idle bit, and a start bit – we can simply decrement needStopStart each time the function is called to get the correct output.  When we are sending character bits, we simply test the current bit to see if it’s a 0 or a 1 and then send the proper logic level on the output pin.

When the message buffer is exhausted the message buffer is set to a blank string and the remaining state machine variables are reset.  The remaining program code can then test the length of the message buffer to figure out if the current message has been completely sent before placing a new message into the buffer.  Testing for a blank message buffer has to be done each time the program wants to send a new message.  If a new message is put into the buffer before the previous message has been completely sent, the output may be corrupted.

This technique works best if your program has a lot of time in between status updates.  In my case, I used this code in a NiCD battery charger I built and I wanted the charger to be able to log the battery voltage on the computer once per second.  So long as the message is short and the check for the battery voltage isn’t happening too quickly this method is very reliable.  If on the other hand, you’re doing something 1000 times per second, you’ll find this to be very limiting because you simply can’t send messages that fast at this baud rate.  Also the baud rate is also a limiting factor since the amount of acceptable timing error is reduced as you try to communicate at faster speeds.

Anyway – I hope this information was helpful.  If you spot an error, please let me know in the comments.

SQL Server 2005: Logon Error 18456, State 11

First, I would like to make a request of anyone reading this.  If you post in some forum somewhere about a problem you’ve been experiencing, please take a few moments to also post what the solution was after you’ve gotten your problem figured out.  I spent a good amount of time researching why I was getting the error in the title of this post and while I could easily find posts online describing the issue, it seemed like almost no one took the time to post the solution.  Those of you who do post your solutions, thank you.

This week we’ve been working on installing VMWare VDI/View so that we can do an evaluation of the product.  Part of that installation process involves setting up a SQL Server database for the vSphere and View pieces of the software and though we could have used MSDE or whatever MS is calling it these days, we wanted to mirror a production environment as closely as possible.  This means that we wanted to use SQL Server 2005 as the back end database and use an Active Directory service account to grant access to the database which is the best practice standard in our environment.

After configuring the account in the AD and setting group memberships, I proceeded to add the new service account to the database server, create a database for the user, make the service account the database owner, and grant further access to the msdb system database.  All of that seemed to work perfectly until it was time to create a data source so the vSphere could access the database.  Suddenly, the service account couldn’t connect and the above error was appearing in the activity log on our SQL Server.

Of course, the above error means that the server was able to verify the account as valid, but had denied the logon attempt.  (Note to the MS SQL Server Product Team: this error is useless without knowing WHY the logon was denied.  Makes me wonder who did the QA on this product…) I spent some time searching online forums for a solution and I actually found one post that mirrored my situation exactly.  The only problem was the original person who posted it didn’t mention if others had helped solve the problem.  Instead, they came to the forum, posted their problem, got some advice, and disappeared into the ether to never be heard from again.  I didn’t want to follow the advice in the thread because it seemed like I’d be going in circles.  After all, I just created the account, added it to the server, and granted rights to the account only moments prior to this.  How could anything be different?

In an attempt to isolate the issue, I added one of my test accounts to the server and made it the owner of the database.  I then went back to the vSphere server, added the test account to the local administrators group, and logged in under the test account.  When I then tested the connection to the database, it worked as expected. Since I couldn’t figure out what was different between the test account and the service account, I ended up deleting the credentials from the SQL Server management console, removing all of the rights I had granted, and then finally adding all of that information back to the server.  Strangely enough, that worked.

I have no explanation as to why that worked as a solution, but next time I run into it, this is the first thing I’m going to try.   Hope it helps.